
Transform your home into a magical winter wonderland by learning how to assemble and decorate your Christmas tree with style, ease, and creativity that will impress everyone.


Decorating a Christmas tree is more than just a holiday tradition—it’s an opportunity to express your personal style while creating lasting memories with loved ones. Whether you’re setting up your first tree or looking to refresh your approach after years of the same routine, mastering the art of tree assembly and decoration can elevate your entire holiday experience.
The good news? You don’t need to be a professional decorator or spend a fortune to achieve stunning results. With the right techniques, a bit of planning, and some creative inspiration, anyone can create a beautifully decorated Christmas tree that becomes the centerpiece of their holiday celebrations. Let’s explore the step-by-step process that will transform your space into a festive paradise. ✨
🎄 Choosing the Perfect Christmas Tree for Your Space
Before diving into decorations, selecting the right tree sets the foundation for everything that follows. The size, shape, and type of tree you choose will significantly impact both the assembly process and the final aesthetic.
For smaller apartments or rooms, a tree between 4 to 6 feet tall works beautifully without overwhelming the space. Larger living areas can accommodate trees ranging from 7 to 9 feet, creating a dramatic focal point. Always measure your ceiling height and leave at least 6 inches of clearance for a tree topper.
Artificial trees offer convenience and longevity, with modern options featuring realistic needle textures and pre-lit configurations that save hours of work. Real trees bring authentic fragrance and traditional charm but require more maintenance and careful disposal after the season ends.
Consider the tree’s branch density as well. Fuller trees provide more surface area for ornaments but may require strategic placement to avoid a cluttered look. Sparse trees work wonderfully with minimalist or Scandinavian-inspired designs where each ornament receives individual attention.
🔧 Assembling Your Tree Like a Professional
Proper assembly ensures stability and creates the ideal canvas for your decorations. Start by selecting a sturdy, level spot away from heat sources like fireplaces, radiators, or heating vents that could dry out a real tree or damage artificial materials.
For artificial trees, begin with the base section and work upward, ensuring each tier locks securely into place. Fluff the branches as you go—this critical step transforms a flat, box-fresh tree into a full, dimensional masterpiece. Pull branches outward and slightly upward, separating individual needle clusters to create depth and volume.
If you’re working with a pre-lit tree, test the lights before completing assembly to identify any broken bulb strings early. This saves the frustration of discovering electrical issues after decorating is complete.
Real trees require a sturdy stand with adequate water capacity—most trees absorb a surprising amount of water daily. Make a fresh cut at the base before placing the tree in the stand to improve water absorption, and check water levels daily throughout the season.
💡 Strategic Lighting Techniques That Dazzle
Lighting transforms your tree from ordinary to extraordinary, so this step deserves careful attention. Plan for approximately 100 lights per foot of tree height—a 6-foot tree would ideally have around 600 lights for a well-lit appearance.
Start stringing lights from the bottom and work upward in a circular pattern, weaving them in and out from the trunk to the branch tips. This creates depth by illuminating the tree’s interior rather than just its surface. Place some strands deeper within the branches to create a magical glowing effect from within.

Warm white lights create a classic, cozy atmosphere that complements traditional décor schemes. Cool white lights offer a modern, crisp appearance perfect for contemporary designs. Multicolored lights bring playful, nostalgic energy that children especially love.
Consider investing in lights with multiple settings—twinkling, fading, or steady options let you adjust the mood throughout the season. Smart LED lights that change colors via smartphone apps provide maximum flexibility for those who enjoy variety.
🎨 Selecting a Cohesive Color Scheme
A unified color palette elevates your tree from random collection to curated display. Choose 2-3 main colors plus metallic accents for a sophisticated look that feels intentional rather than chaotic.
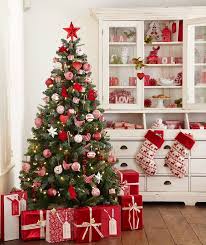
Classic combinations never fail: red and gold radiate traditional warmth, silver and blue create winter wonderland elegance, while green and copper offer earthy sophistication. For modern aesthetics, try monochromatic schemes using various shades of a single color family.
Don’t feel obligated to match your existing room décor perfectly—your Christmas tree can serve as an accent piece that introduces complementary colors to your space. However, ensure the overall vibe aligns with your home’s atmosphere for visual harmony.
Metallic elements like gold, silver, or rose gold add dimension and reflect light beautifully, enhancing your lighting efforts. Use metallics as 25-30% of your overall ornament collection for balance without overwhelming the design.
✨ The Art of Ornament Placement
Ornament arrangement separates amateur trees from professionally styled masterpieces. Start with larger ornaments first, distributing them evenly throughout the tree at varying depths. Place some ornaments closer to the trunk and others near branch tips to create visual interest and dimension.
Follow the “triangle rule”—avoid placing ornaments in straight vertical or horizontal lines. Instead, imagine connecting three ornaments to form triangles throughout the tree, creating balanced visual flow that naturally guides the eye around the entire display.
Medium-sized ornaments fill the gaps next, while smaller decorations and specialty pieces find homes in the remaining spaces. Save your most treasured or unique ornaments for eye-level placement where they’ll receive maximum appreciation.
Don’t overcrowd branches—ornaments need space to shine individually. If you can’t see portions of the tree between decorations, you’ve likely gone overboard. Embrace negative space as part of the design rather than something to be filled.
🎀 Adding Ribbons and Garlands for Texture
Ribbons and garlands introduce movement, texture, and professional polish to your tree. Wired ribbon works best because it holds its shape, allowing you to create beautiful cascading effects or structured bows that maintain their appearance all season.
For garland application, use the “tucking method”—loosely drape garland in swooping curves around the tree, tucking portions deeper into branches while allowing other sections to cascade outward. This creates organic, flowing lines rather than rigid circular patterns.
Beaded garlands add sparkle and elegance, while natural elements like wooden bead strands or dried orange slices introduce rustic charm. Popcorn or cranberry garlands bring nostalgic, handmade warmth perfect for traditional or farmhouse aesthetics.
If using ribbon, cut lengths of 18-24 inches and tuck individual pieces vertically throughout the tree, allowing them to cascade downward. This technique creates movement and fills visual gaps without the commitment of one continuous ribbon strand that’s difficult to adjust.
⭐ Choosing and Placing Your Tree Topper
Your tree topper serves as the crowning glory that completes the entire design. Traditional stars and angels remain popular choices, but modern options include decorative finials, oversized bows, or even creative alternatives like floral arrangements or abstract sculptures.
Ensure your topper is proportional to your tree size—a topper that’s too large overwhelms the design, while one that’s too small appears as an afterthought. As a general rule, your topper should be roughly one-tenth of your tree’s total height.
Secure toppers properly using the attachment mechanism designed for your tree type. Many artificial trees feature a reinforced center branch specifically for topper support, while real trees may require additional wire support to prevent leaning or toppling.
Consider your topper’s style in relation to your overall theme. A rustic burlap bow wouldn’t complement an elegant silver and crystal scheme, just as a formal beaded angel might clash with a playful, colorful children’s tree.
🌟 Creating Depth with Layering Techniques
Professional decorators swear by layering—the technique of building visual depth through strategic placement of decorations at varying distances from the tree’s center. This approach prevents the flat, two-dimensional appearance common in hastily decorated trees.
Start with your foundational layer: lights placed deep within the branches. Next comes your garland or ribbon layer, woven through the mid-depth portions of branches. Larger ornaments form the third layer, positioned at various depths throughout the tree.
Smaller ornaments and specialty picks create the fourth layer, filling gaps and adding detail. Finally, the surface layer consists of the most decorative elements—perhaps glittered picks, floral stems, or statement ornaments that extend slightly beyond the tree’s natural silhouette.
This layered approach creates complexity and richness that makes your tree visually interesting from every angle. Viewers discover new details each time they look, rather than taking in everything at a single glance.
🏡 Styling Around Your Tree for Maximum Impact
Don’t let your decorating efforts stop at the tree itself—the surrounding area contributes significantly to the overall presentation. A beautiful tree skirt conceals the stand while adding color, texture, and polish to the base.
Arrange wrapped gift boxes (empty or filled) beneath the tree in varying sizes and coordinating wrapping paper that complements your tree’s color scheme. This creates visual weight at the bottom and makes your tree appear grounded and intentional.
Consider flanking your tree with complementary elements: matching garlands on the mantel, coordinating stockings, or small decorated trees or plants that echo your main tree’s styling. This creates a cohesive holiday vignette rather than an isolated decorative element.
Lighting around the tree matters too—dimming overhead lights while illuminating the tree creates dramatic focus and enhances the magical glow of your tree lights. Small accent lights on nearby furniture reinforce the warm, festive atmosphere.
🧸 Including Personal and Sentimental Touches
While coordinated aesthetics create visual beauty, meaningful ornaments transform your tree into a cherished family tradition. Dedicate specific branches or sections to handmade ornaments from children, vintage family pieces, or souvenirs from special trips and life events.
Create a “memory section” where mismatched sentimental ornaments cluster together, telling your family’s unique story. This approach allows you to maintain an overall cohesive design while honoring pieces that don’t perfectly match your chosen color scheme.
Consider starting an annual tradition of adding a dated ornament each year—these markers become time capsules that prompt wonderful conversations and memories during future decorating sessions.
Personalized ornaments with names, photos, or special messages add warmth that perfectly coordinated store-bought decorations simply cannot replicate. Balance is key—enough personality to make the tree uniquely yours, but not so much that it appears chaotic.
🛡️ Safety Considerations for Peace of Mind
Beautiful decorations mean nothing if safety concerns create anxiety or, worse, actual hazards. Always use lights rated for indoor use and check for frayed wires or damaged sockets before installation. Never overload electrical outlets—use appropriate extension cords and surge protectors.
Keep real trees well-watered throughout the season, as dry trees become significant fire hazards. Consider a tree watering system that monitors moisture levels if you tend to forget daily checks.
If you have curious pets or small children, secure your tree with fishing line attached to wall hooks or ceiling points to prevent toppling. Place fragile or valuable ornaments higher on the tree, reserving lower branches for shatterproof options.
Turn off tree lights when leaving home or going to bed—this simple habit dramatically reduces fire risk while extending bulb life. Smart plugs with timers automate this process, providing convenience alongside safety.
📸 Capturing and Sharing Your Creation
After investing time and creativity into your beautiful tree, document your work with quality photos. Photograph during evening hours when tree lights shine brightest against darker surroundings for the most dramatic images.
Experiment with angles—capture the full tree from slightly above for a classic shot, take close-ups of special ornament arrangements, and photograph your tree as a background element with family members enjoying the space.
Natural light from windows during daytime creates softer, magazine-worthy images that showcase true colors and details invisible in harsh overhead lighting. Try turning off other lights and using only tree illumination for moody, atmospheric shots.
Share your creation with online communities, friends, and family—not just for validation, but to inspire others and participate in the collective joy of the season. Your styling choices might spark ideas for someone else’s perfect tree.
♻️ Maintaining Your Tree Throughout the Season
A beautifully decorated tree deserves maintenance to keep it looking fresh from the first day of December through New Year’s celebrations. For real trees, daily watering remains essential—check levels each morning as part of your routine.
Periodically inspect lights for burnt-out bulbs, replacing them promptly to maintain consistent illumination. Artificial trees benefit from gentle dusting with a soft cloth or feather duster to remove accumulated dust that dulls ornaments and lights.
Tighten any ornament hooks that have loosened, and adjust branches that may have shifted under the weight of decorations. This quick weekly check keeps everything looking intentional rather than neglected.
If you notice your tree leaning or becoming unstable, address the issue immediately by adjusting the stand or adding additional support. A toppled tree creates mess, potential injuries, and damaged decorations—prevention is always easier than cleanup.
🎁 Making Your Tree the Heart of Holiday Traditions
Your decorated tree naturally becomes a gathering point for holiday activities and traditions. Establish rituals around your tree—reading Christmas stories in its glow, enjoying hot chocolate while admiring decorations, or playing holiday music during nightly viewing sessions.
Make tree decorating itself a special event rather than a chore rushed through alone. Invite family and friends, play festive music, serve seasonal treats, and turn the process into a celebration that everyone remembers fondly.
Use your tree as a backdrop for annual family photos that document how children grow and family dynamics evolve. Years from now, these images will trigger powerful memories associated with specific ornaments, decorating mishaps, and holiday joy.
The true beauty of a Christmas tree isn’t measured solely in visual perfection but in the warmth, memories, and traditions it represents. Let your tree reflect your personality, honor your heritage, and create new traditions that future generations will cherish. 🎄✨